Enabling Cody on Sourcegraph Enterprise
This guide will walk you through the steps to install and set up Cody with your Sourcegraph Enterprise instance.
Cody enhances your coding experience by providing intelligent code suggestions, context-aware completions, and advanced code analysis.

Cody Enterprise features
To cater to your Enterprise requirements, Cody Enterprise offers the following features:
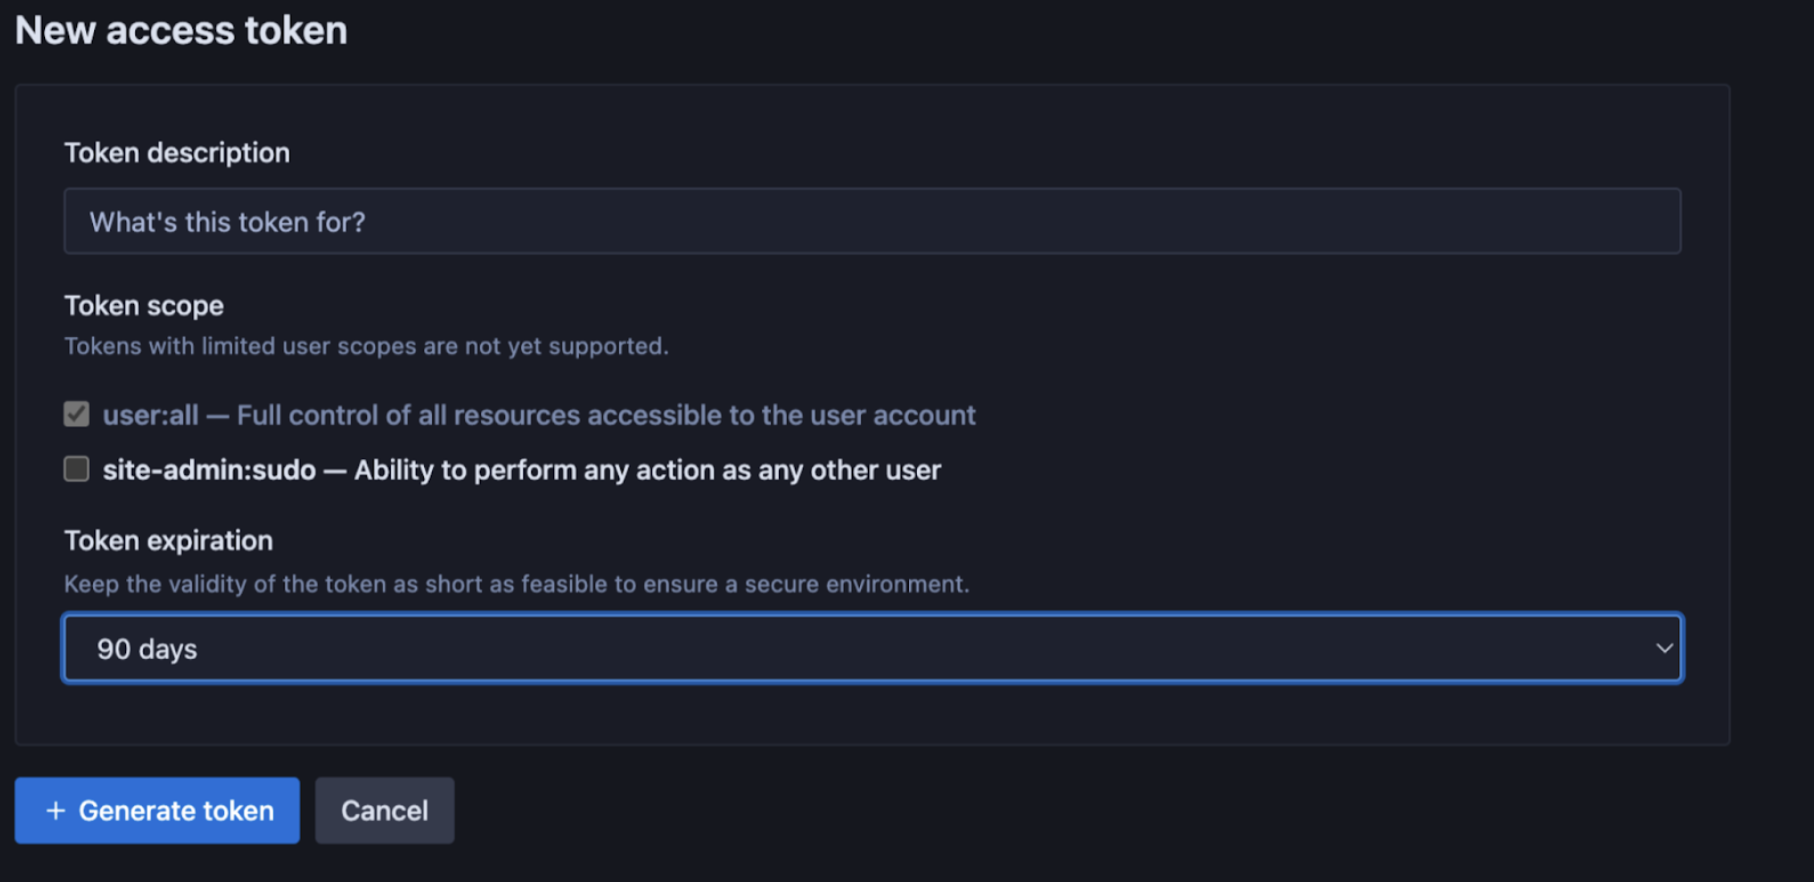
IDE Token Expiry
Site administrators can customize the time duration of the access token used by other users on the Sourcegraph Enterprise instance to connect Cody from their IDEs via the Site admin page. Administrators can choose from various options, including 7, 14, 30, 60, and 90 days.
Guardrails
Open source attribution guardrails for public code reduce the exposure to copyrighted code, commonly called copyright guardrails. This involves the implementation of a verification mechanism within Cody to ensure that any code generated by the platform does not replicate open source code.
Guardrails for public code are available to all Sourcegraph Enterprise instances and are disabled by default. You can enable it from the Site configuration. You can do so by setting "attribution.enabled": true in site config.
It only matches code snippets that are at least 10 lines or longer, and the search corpus 290,000 open source repositories.
Admin Controls
Sourcegraph account admins have selective control over users' access to Cody Enterprise, which is now managed via the Sourcegraph role-based access control system. This provides a more intuitive user interface for assigning permission to use Cody.
Analytics
Cody Enterprise users get a clear view of usage analytics for their instance on a self-service basis. A separately managed cloud service for Cody analytics handles user auth, gets metrics data from Sourcegraph's BigQuery instance, and visualizes the metrics data.
The following metrics are available for Cody Enterprise users:
| Metric Type | What is measured? |
|---|---|
| Active users | - Total active users - Average daily users - Average no. of days each user used Cody (of last 30 days) - Cody users by day (last 30 days) - Cody users by month (last two months) - Cody users by number of days used |
| Completions | - Total accepted completions - Minutes saved per completion - Hours saved by completions - Cody completions by day - Completions acceptance rate - Weighted completions acceptance rate - Average completion latency - Acceptance rate by language |
| Chat | - Total chat events - Minutes saved per chat - Hours saved by chats - Cody chats by day |
| Commands | - Total command events - Minutes saved per command - Hours saved by commands - Cody commands by day - Most used commands |
To enable Cody Analytics:
- Create an account on Sourcegraph Accounts
- A user already having an account on Sourcegraph.com gets automatically migrated to Sourcegraph Accounts. Users can sign in to Cody Analytics using their email and password
- Users without a Sourcegraph.com account, please get in touch with one of our teammates. They can help with both the account setup and assigning instances to specific users
- Map your user account to a Sourcegraph instance, and this gives you access to Cody's analytics
Multi-repository context
Cody Enterprise supports searching up to 10 repositories to find relevant context in chat.
- In VS Code, open a new Cody chat, type
@, and selectRemote Repositoriesto search other repositories for context - In JetBrains, use the enhanced context selector
Smart Context Window
smartContextWindow configuration is available with Sourcegraph v>=v5.4.5099 for VS Code (v>=1.20.0) and JetBrains (v>=6.0.0) Cody clients.Sourcegraph Enterprise versions >=5.4.5099 have the smartContextWindow configuration enabled by default. You can access this configuration from the Site Admin > Site configuration panel.
Once enabled, your Cody IDE extension will follow the most optimized context window settings for the selected models and ignore the value configured in the chatModelMaxTokens field.
This feature allows you to configure the context window size based on the selected model and has separate context bandwidths for chat input and user-added context. The smartContextWindow configuration is currently supported for the Claude-3 Opus, Claude-3 Sonnet, GPT-4o, and GPT Turbo LLM models.
Cody will revert to the value configured on chatModelMaxTokens or the default value of 7000 token limit if one of these conditions is met:
- If
smartContextWindowis enabled on the instance and you run an unsupported Cody plugin version. In this case, thesmartContextWindowfield will be ignored, and the value configured onchatModelMaxTokensor the default value of 7000 token limit will be applied - If the
smartContextWindowconfiguration is set todisabled, Cody will again revert to the default value of 7000 token limit
Let's see how enabling smartContextWindow would work:
- Make sure you are on the latest Sourcegraph Enterprise version and have the latest Cody extension installed
- You have one of the supported LLM models (Claude-3 Opus, Claude-3 Sonnet, GPT-4o, or GPT Turbo) selected for chat
- Open your codebase in your IDE, for example, VS Code
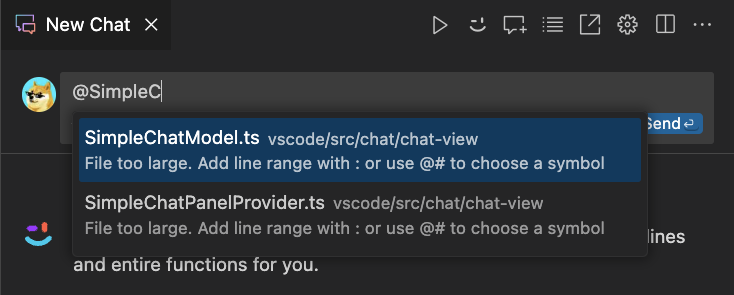
- Start a new chat and
@-mentiona file that's large enough to trigger thesmartContextWindowfeature - To double-check
@-mentionanother large file in the same chat - Type your question in the chat window and hit Enter
- With the
smartContextWindowconfiguration enabled, Cody will be able to answer your question without triggering theFile too largewarning

If your site admin has disabled the smartContextWindow configuration and has configured the chatModelMaxTokens limit, Cody will now use the chatModelMaxTokens limit for your selected chat models. If the @-mention file size does not adhere to the predefined chatModelMaxTokens limit, you get the usual File too large warning.
A few considerations to keep in view:
- For BYOK customers, there may be a financial impact because the number of tokens per request may increase, resulting in the LLM usage costs
- Cody Gateway customers will not have any financial implications as Sourcegraph is responsible for the LLM usage cost
- For customers who wish to consume the expanded context window without upgrading their instance, they may set the
“chatModelMaxTokens: 45000”
Setting up Cody Enterprise
You can set up Cody for your Enterprise instance in one of the following ways:
Cody on self-hosted Sourcegraph Enterprise
Prerequisites
- You have Sourcegraph version 5.1.0 or above
- A Sourcegraph Enterprise subscription with Cody Gateway access or an account with a third-party LLM provider
Enable Cody on your Sourcegraph instance
Cody uses one or more third-party LLM (Large Language Model) providers. Make sure you review Cody's usage and privacy notice. Code snippets are sent to a third-party language model provider when you use the Cody extension.
This requires site-admin privileges. To do so,
- First, configure your desired LLM provider either by Using Sourcegraph Cody Gateway (recommended) or Using a third-party LLM provider directly
- Next, go to Site admin > Site configuration (
/site-admin/configuration) on your instance and set:
JSON{ // [...] "cody.enabled": true }
Cody is now fully enabled on your self-hosted Sourcegraph enterprise instance!
Cody on Sourcegraph Cloud
- With Sourcegraph Cloud, you get Cody as a managed service, and you do not need to enable Cody as is required for self-hosted setup
- However, by contacting your account manager, Cody can still be enabled on-demand on your Sourcegraph instance. The Sourcegraph team will refer to the handbook
- Next, you can configure the VS Code extension by following the same steps as mentioned for the self-hosted environment
- After which, you are all set to use Cody with Sourcegraph Cloud
Learn more about running Cody on Sourcegraph Cloud.
Disable Cody
To turn Cody off:
- Go to Site admin > Site configuration (
/site-admin/configuration) on your instance and set:
JSON{ // [...] "cody.enabled": false }
- Next, remove
completionsconfiguration if they exist
Enable Cody only for some users
To enable Cody only for some users, for example, when rolling out a Cody POC, follow all the steps mentioned in Enabling Cody on your Sourcegraph instance. Then, do the following:
Sourcegraph 5.3+
In Sourcegraph 5.3+, access to Cody is managed via user roles. By default, all users have access.
First, ensure Cody is enabled in your site configuration. Go to Site admin > Site configuration (/site-admin/configuration) on your instance and set:
JSON{ // [...] "cody.enabled": true, // Make sure cody.restrictUsersFeatureFlag is not in your configuration! If it is, remove it. }
cody.restrictUsersFeatureFlag is not in your site configuration. If it is, remove it or else the old feature-flag approach from Sourcegraph 5.2 and earlier will be used.Next, go to Site admin > Users & Auth > Roles (/site-admin/roles) on your instance. On that page, you can:
- Control whether users by default have access to Cody (expand
User [System]and toggle Cody > Access as desired) - Control whether groups of users have access to Cody (
+Create roleand enable the Cody > Access toggle as desired)
Sourcegraph 5.2 and earlier
In Sourcegraph 5.2 and earlier, you should use the feature flag cody to turn Cody on selectively for some users. To do so:
- Go to Site admin > Site configuration (
/site-admin/configuration) on your instance and set:
JSON{ // [...] "cody.enabled": true, "cody.restrictUsersFeatureFlag": true }
- Next, go to Site admin > Feature flags (
/site-admin/feature-flags) - Add a feature flag called
cody - Select the
booleantype and set it tofalse - Once added, click on the feature flag and use add overrides to pick users that will have access to Cody

Supported models and model providers
Cody Enterprise supports many models and model providers. You can configure Cody Enterprise to access models via Sourcegraph Cody Gateway or directly using your own model provider account or infrastructure.
- Using Sourcegraph Cody Gateway:
- Recommended for most organizations.
- Supports state-of-the-art models from Anthropic, OpenAI, and more, without needing a separate account or incurring separate charges.
- Using your organization's account with a model provider:
- Using your organization's public cloud infrastructure:
- Use Amazon Bedrock (AWS)
- Use Azure OpenAI Service
- Use Vertex AI on Google Cloud (coming soon)
Use your organization's Anthropic account
First, create your own key with Anthropic. Once you have the key, go to Site admin > Site configuration (/site-admin/configuration) on your instance and set:
JSON{
  // [...]
  "cody.enabled": true,
  "completions": {
    "provider": "anthropic",
    "chatModel": "claude-2.0", // Or any other model you would like to use
    "fastChatModel": "claude-instant-1.2", // Or any other model you would like to use
    "completionModel": "claude-instant-1.2", // Or any other model you would like to use
    "accessToken": "<key>"
  }
}
Use your organization's OpenAI account
First, create your own key with OpenAI. Once you have the key, go to Site admin > Site configuration (/site-admin/configuration) on your instance and set:
JSON{
  // [...]
  "cody.enabled": true,
  "completions": {
    "provider": "openai",
    "chatModel": "gpt-4", // Or any other model you would like to use
    "fastChatModel": "gpt-3.5-turbo", // Or any other model you would like to use
    "completionModel": "gpt-3.5-turbo-instruct", // Or any other model that supports the legacy completions endpoint
    "accessToken": "<key>"
  }
}
Learn more about OpenAI models.
Use Amazon Bedrock (AWS)
You can use Anthropic Claude models on Amazon Bedrock.
First, make sure you can access Amazon Bedrock. Then, request access to the Anthropic Claude models in Bedrock. This may take some time to provision.
Next, create an IAM user with programmatic access in your AWS account. Depending on your AWS setup, different ways may be required to provide access. All completion requests are made from the frontend service, so this service needs to be able to access AWS. You can use instance role bindings or directly configure the IAM user credentials in the configuration. Additionally, the AWS_REGION environment variable will need to be set in the frontend container for scoping the IAM credentials to the AWS region hosting the Bedrock endpoint.
Once ready, go to Site admin > Site configuration (/site-admin/configuration) on your instance and set:
JSON{
  // [...]
  "cody.enabled": true,
  "completions": {
    "provider": "aws-bedrock",
    "chatModel": "anthropic.claude-3-opus-20240229-v1:0",
    "completionModel": "anthropic.claude-instant-v1",
    "endpoint": "<See below>",
    "accessToken": "<See below>"
  }
}
For the chatModel and completionModel fields, see Amazon's Bedrock documentation for an up-to-date list of supported model IDs, and cross reference against Sourcegraph's supported LLM list to verify compatibility with Cody.
For endpoint, you can either:
- For Pay-as-you-go, set it to an AWS region code (e.g.,
us-west-2) when using a public Amazon Bedrock endpoint - For Provisioned Throughput, set it to the provisioned VPC endpoint for the
bedrock-runtimeAPI (e.g.,"https://vpce-0a10b2345cd67e89f-abc0defg.bedrock-runtime.us-west-2.vpce.amazonaws.com")
For accessToken, you can either:
- Leave it empty and rely on instance role bindings or other AWS configurations in the
frontendservice - Set it to
<ACCESS_KEY_ID>:<SECRET_ACCESS_KEY>if directly configuring the credentials - Set it to
<ACCESS_KEY_ID>:<SECRET_ACCESS_KEY>:<SESSION_TOKEN>if a session token is also required
Use Azure OpenAI Service
Create a project in the Azure OpenAI Service portal. Go to Keys and Endpoint from the project overview and get one of the keys on that page and the endpoint.
Next, under Model deployments, click "manage deployments" and ensure you deploy the models you want, for example, gpt-35-turbo. Take note of the deployment name.
Once done, go to Site admin > Site configuration (/site-admin/configuration) on your instance and set:
JSON{
  // [...]
  "cody.enabled": true,
  "completions": {
    "provider": "azure-openai",
    "chatModel": "<deployment name of the model>",
    "fastChatModel": "<deployment name of the model>",
    "completionModel": "<deployment name of the model>", // the model must support the legacy completions endpoint such as gpt-3.5-turbo-instruct
    "endpoint": "<endpoint>",
    "accessToken": "<See below>"
  }
}
For the access token, you can either:
- As of 5.2.4 the access token can be left empty and it will rely on Environmental, Workload Identity or Managed Identity credentials configured for the
frontendandworkerservices - Set it to
<API_KEY>if directly configuring the credentials using the API key specified in the Azure portal
Use StarCoder for Autocomplete
When tested with other coder models for the autocomplete use case, StarCoder offered significant improvements in quality and latency compared to our control groups for users on Sourcegraph.com. You can read more about the improvements in our October 2023 release notes and the GA release notes.
To ensure a fast and reliable experience, we are partnering with Fireworks and have set up a dedicated hardware deployment for our Enterprise users. Sourcegraph supports StarCoder using the Cody Gateway.
To enable StarCoder go to Site admin > Site configuration (/site-admin/configuration) and change the completionModel:
JSON{
  // [...]
  "cody.enabled": true,
  "completions": {
    "provider": "sourcegraph",
    "completionModel": "fireworks/starcoder"
  }
}
Users of the Cody Extensions will automatically pick up this change when connected to your Enterprise instance.
It's recommended that every instance admin not using a third-party LLM provider makes this change and we are planning to make this the default in a future release.